Showing posts with label scraps. Show all posts

Wednesday, July 2, 2014

wip wednesday

busy week, and not much sewing done.
 
i made a meshwork pillowtop for my son.  added some free motion quilting around it, then (knowing my boy) went back to secure all the meshwork lines with some hidden stitches.

 i'm stuck with the back of this pillow. not sure yet how to combine those pièces into one.


a new  hexagon quilt is in progress. i'm not sure how it will look in the end -  making it up from scraps as i go.
also, starting a huge hand project like this, just two weeks before getting a (surprise!) new sewing machine is... meh.

 
the tutorial to my embrodered rings is all up, and that's the main reason why i did so little sewing this week. 


linking to wip wednesday
 

Tuesday, May 13, 2014

tutorial - crazy curvy coasters


i got a few lovely emails asking how i did my crazy curvy coasters.  they are actually very easy to do , and a great use for some  scraps and leftover bias! 
 you can see some of my curvy crazy coasters here.
 
first, let's plan our pieces.here  i'm using word to draw a 4-pieces coaster .
 
starting with a big circle, in 4 parts.
(if you're after a hexagon shape, simply start with an Equilateral triangle)
 
 
 i want my parts to be a little more interesting , so i'll add curves to the main pièces shape

 copy and paste the same curve, rotate it by 90 degrees and place on the other side of your main piece.


because we used the same curves, 4 of those pièces will interlock into eachother, creating the coaster.
from here, i find it easier to print and draw the inner curves by pencil (and eraser !).
 
this is the final model i came up with :
 
write a number on each part before you cut the paper off. those numbers will help keep you focus on the right side of the fabric, and place within the final coaster shape.

cut your fabrics exactly the size of the your models. no need to add seam allowance.
 arrange all your pièces on some fusible interfacing , light or medium weight - whatever you have. no fusible interfacing  ?  you can use temporary glue spray to hold the fabrics in place.
using some freezer paper to protect your iron, press carefully . 
cut around.

as you can see, the match is not 100 percent, but that's ok, time to cover the lines.
 
you can cover them with thin bias tape , with or without embroidery garnish:
 
 you can cover the lines using  thick embroidery stitches. here i used herringbone stitch with multicolor thread:


(of course, if you're friendly enough with your sewing machine, a zig-zag stitch is the fastest option).
 
 
line the back (if you want) and finish with bias tape around , or some embroidery/crochet , as you want.


Friday, May 9, 2014

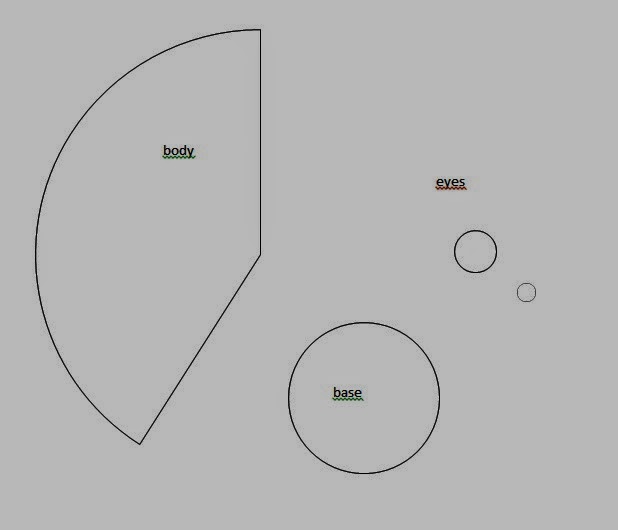
tutorial - mini owl

yesterday , i had fun sewing a small blue owl. working out pattern, size shape... i like experimenting like that (who am i kidding? i'm just putting off finishing my new wrap skirt, buttonholes are scary !) .
this morning , i called my husband over  to see what i did and the poor little owl was GONE.  an intensive hunt around the house found him parked on the former's screen.  i've been told it has been relocated to a better place  as 'the baby owl didn't like your messy table'.
right.
 
i know the truth.
it's too cute to resist.
 
 
here is how i made the mini owl (purple turtle photobombing) :
 
 
 cut your fabrics.  i used cotton scrap for the body and felts for the base and eyes.
 fold the body, right sides together, and sew them.
 
 
fill the conus with whatever. i used  yarn leftovers.
sew loosly around the edge of the conus and pull carefull on the thread, the edges will fold Inside into a round shape. know the thread, push the filling in again, and sew your base on.


now, push the filling out of the top part, and fold it down. pin the eyes on.  play with the pins until you're happy with the shape of your owl and sew in place.
in this owl, my seem is just in the middle, so it comes out Under the 'beak', in the blue owl , the seem is sideway. see what works for your owl.


 all done, ready to go out .


Wednesday, May 7, 2014

star in hexagon


a few weeks ago, aimlessly wandring in pinterest for hours (and hours and hours) , i found this amazing block.
there is a beutiful tutorial to make it right here, but i wanted to use my fabric samplers, size 4X5 cms. following the tutorial and adjusting to my scraps, this is what i came up with  -


i think it's as good as the original, don't you?
 
 
linking to WIP wednesday

Saturday, May 3, 2014

still playing with scraps


i think i'm done practicing. next one would be a masterpiece.

Friday, May 2, 2014

crazy curvy coasters


my man likes to collect antique furnitures, and Murano glass vases.  to keep the last from scratching the former, he needs something in between them.  therefor, he keep a high demand for more and more coaster, and it's up to me to provide them.
could be worse, before i learned patchwork , i had to crochet doilys.


first one is Somerset points. easy to do, but a bit of wasting fabric.


the rest are crazy curvy coasters.  mostly from the scraps box. fun and easy to make :)


linking to kim at sewgo saturday

Tuesday, April 29, 2014

twisted log cabin pillow


when i saw this , i knew i must make one for myself.  


pretty, isn't it? 


posted on wip wenesday
 

a fistfull of scraps

Aimee from my patchwork club gave me a huge bag of fabric samples  (thank you Aimee !).


this is about a third of them .  size varied between 4X4cm, 4X5 and 5X5 cm.
 
so, this week i'm playing with small squres and color gradients.  this technique  makes is fast and easy.the main chanllenge is to sort throught the mess and find the right color piece.


they were fun to make. not sure what those blocks will be when all grown ups.


show and tell